Practise Your V Layer Designing Techniques
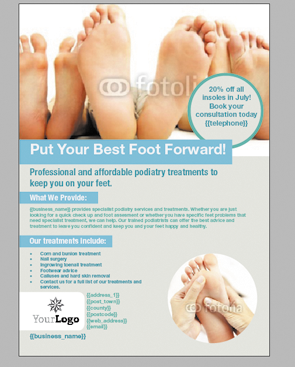
To help you get to grips with our V layer technology, we’ve put together a simple step-by-step tutorial for you to practise on. This tutorial will walk you through the necessary stages to build a single sided A5 leaflet designed for a podiatrist. This leaflet uses V layers to create both a circular image and has a second image which features a circle shape overlaying the image. You can see what the final layout for your tutorial design should look like to the left.
To get started, download the InDesign files for the tutorial here and follow the instructions below.
How does it work?
To create a V layer you need to create a mask (or masks) of the shape you want to use and place it on its own layer. ‘Ë?V’ stands for vector which means that anything on a V layer must be a vector object – you cannot use images, EPS files or other graphic elements on a V layer.
Before you attempt our V Layers Tutorial, make sure you have read this post to help you understand the basic V Layer design rules.
STEP 1 – Punch out a shape
Firstly you need to make the shaped, circular image in the bottom right hand corner of the design. To do this:
 – Create a light grey rectangle the size of your A5 document.
– Create a circle shape at the size you wish the circular image to be (approximately 58mm in diameter).
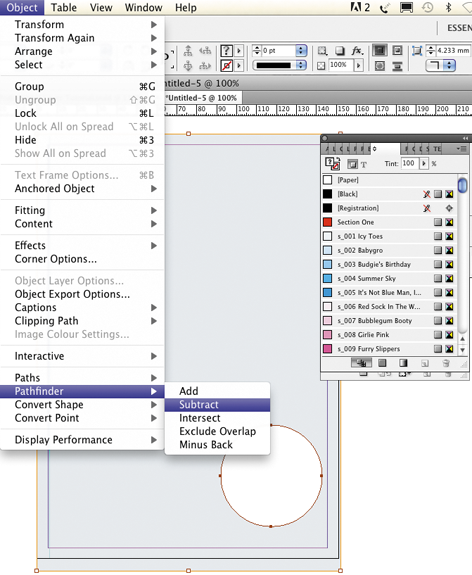
– Place this over the rectangle at the point where you want the image to be displayed. Select both the rectangle and the circle and go to: Object > Pathfinder > Subtract in InDesign to ‘punch out’ the circle from your rectangle (below image).
– Create a new layer and call it ‘v_layer 1′ and place the rectangle shape on to it. Place the smaller foot image on its own layer called ‘Ë?Image 1′ and ensure it is below your new V layer.
– Put the 3 blue rectangle boxes for the text headers on to their own individual V layers (ie. ‘Ë?v_blue box 1 etc.). These should be above ‘v_layer 1′ in your layers palette and each text box will need to be above its V layer in the layer palette stacking order (see image to the right).
Don’t forget, only one element per editable layer.
STEP 2 – vector element over an image
Next you need to place a circular vector with text over an image. To do this:
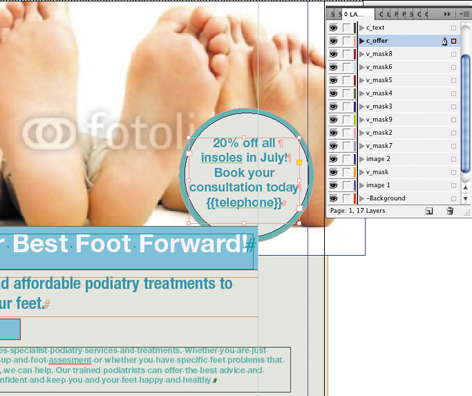 – Place the larger image with several feet at the top of your InDesign document so that it spans the full width. It should be on its own layer (eg. ‘Ë?Image 2′). Make sure you leave the white box behind it on the background, this acts as a white ‘canvas’ behind the image in case the client deletes it.
– Create a turquoise blue vector circle and put it onto a new V layer (eg. ‘v_layer 2′)
– Create a slightly smaller grey circle and position it on top of your turquoise circle. Again put it on its own individual V layer (eg. ‘v_layer 3′).
– Position the promotional text box above the two circles on its own layer (see image to the left). Consider using Copyfit to give end clients more editing flexibility.
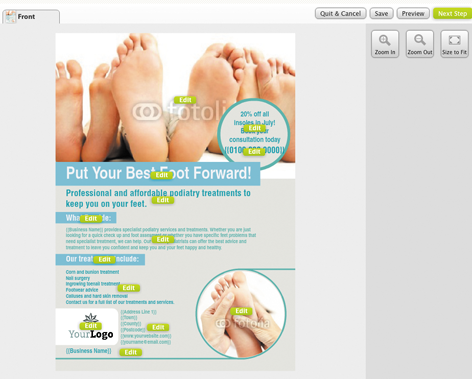
STEP 3 – check, finalise & upload
Once you’ve positioned all images, text boxes and V layers as described, separate out the remaining elements onto layers and check the layers palette to ensure they are in the right order.
- Images should be below V layers
- Relevant text boxes should be above V layers
- Anything that overlaps a V layer must be editable or placed on another V layer
If you want to use non-standard shapes (eg. rounded corners, stars etc.), you will need to draw these yourself as no InDesign Object Effect or Corner Effect options are allowed on a V layer. A white vector rectangle with rounded corners has already been provided in the tutorial InDesign file for you to place the placeholder logo on (don’t forget this will need to be a V layer as it is placed over another V layer in the layers palette).
This is how your final design should look at the ‘Try Template’ stage (see image to the right above).
Use the Final Checklist below before uploading your design. When you upload and build your design, name it using your name and ‘V Layer Test’ in the title so we know to remove your design from the Design Approval List.
V Layers Final Checklist:- Label your layer as v_ (v_layer 1 for instance)
- Only use vector shapes on V layers
- Only one item per V layer
- You can have more than one V layer per design
- Position any images that are to be editable through your V Layer below the V layer
- Remember that V layers aren’t editable by the end user
 Wij betalen u €500,- per maand voor uw designs!!
TemplateCloud is een online marktplaats waar grafische designers – zoals u – hun designs kunnen uploaden en onbeperkt royalties kunnen verdienen. U maakt designs voor flyers, briefpapier, visitekaartjes enzovoorts. Wij zetten deze designs om in een bewerkbare template zodat dit online kan worden verkocht.
Wij verkopen uw design templates via verschillende websites over de hele wereld. Elke keer dat een klant uw design gebruikt, betalen wij u een royalty. Wij betalen u vooraf € 5,- per inzending voor maximaal 100 designs per maand – dit is gegarandeerd. Om te beginnen met het ontwerpen heeft u alleen Adobe InDesign nodig en een werkende internetverbinding, en wees creatief.
Als u hulp nodig heeft met het zoeken van afbeeldingen, kunt u ook de Fotolia afbeeldingen gebruiken. U kunt kiezen uit miljoenen afbeeldingen en deze gebruiken in uw design – gratis! Lees hier meer voor meer informatie.
So what are you waiting for? Bezoek TemplateCloud.com en begin met het verdienen van royalties doormiddel van het verkopen van uw designs.
Algemene voorwaarden:
1. �én account per deelnemer.
2. Tijdelijke aanbieding. Geldt alleen voor designs die geleverd en goedgekeurd worden voor 31-12-2012.
3. Betalingen kunnen alleen worden gedaan op de vooraf geleverde bankrekeningen.
4. Alle Royalties die verdient zijn doormiddel van het verkopen van designs op grond van de Template Supply Agreement zullen worden verrekend met het totaal betaalde Advanced Template Royalties.
5. U mag de Template Supply Agreement niet beëindigen in verband met iedere design die geleverd is op grond van deze promotie.
6. Beperkt aanbod van een maximum van 100 designs per deelnemer, per maand, goedgekeurd en beoordeeld door ons.
Feestelijke Design Ideeën

Bij TemplateCloud zijn wij fans van een vroegtijdige planning, dus hebben we vooruit gekeken naar de komende paar maanden om te zien naar wat voor soort ontwerpen onze opdrachtgevers op zoek zijn om te kopen tijdens de feestdagen.
Veel van jullie hebben al veel kerstkaarten geüpload voor de verkoop van de maanden oktober en november. Evenals het verzenden van een kerstkaart, gebruiken veel bedrijven, gemeenschappen en organisaties ook flyers en folders om andere gebeurtenissen en tradities onder de aandacht te brengen. Denk bijvoorbeeld ook aan:
Kerstfeesten en evenementen
Naast de promotionele ontwerpen voor de voor de hand liggende 1e en 2e kerstdag evenementen in bars en clubs, vergeet niet de andere bedrijven die bijvoorbeeld catering of zaal verhuur aanbieden. Restaurants maken ook vaak kerstmenu’s in de aanloop naar Kerstmis voor vroegboekers en kortingen voor grote partijen.
Kerstmarkten
Zeer populaire evenementen voor ambachtslieden en leveranciers van zelfgemaakte producten. Zorg ervoor dat u een ruimte maakt van wat er beschikbaar is om te kopen en een ruimte waar de locatie en data op kan voor het evenement.
Kerstconcerten
Of ze nu een gemeenschap of een professionele service zijn, kerstconcerten moeten nog steeds onder de aandacht worden gebracht bij het publiek.
Oud & Nieuw
Net zoals met kerst evenementen, is Oud & Nieuw een grote gebeurtenis voor de bars en clubs, dus promotionele Oud & Nieuw ontwerpen voor deze sector zijn altijd populair. Wederom bieden vele restaurants en clubs ook ‘s avonds pakketten aan zoals voordeelmenu’s of entertainment.
Januari Sales
�én van de grootste jaarlijkse evenementen in de detailhandel! Vergeet niet dat andere sectoren ook hun eigen januari sales houden. Dit kan in de vorm van algemene kortingen over producten en diensten, zoals geen inschrijvingsgeld voor opleidingen of sprotscholen wanneer er wordt geboekt in januari of een 3-gangenmenu voor de prijs van een 2-gangenmenu in restaurants bijvoorbeeld.
Goede voornemens in het nieuwe jaar
Bedrijven doen vaak een beroep op klanten met goede voornemens aan het begin van het nieuwe jaar. Koppen zoals ‘Nieuw jaar, Nieuwe jij’ zijn vaak gebruikt door sportscholen en gezondheids- en schoonheidsproducten sector. Het is ook de tijd voor renovaties en decoraties bij mensen thuis. Vergeet niet om een ruimte te maken voor een korting of een andere soortgelijke promotie om opdrachtgevers te helpen.
Versla de winterdepressie
We hebben allemaal last van sommige sectoren en hun marketing materiaal om producten of diensten aan te bieden aan het begin van het nieuwe jaar. ‘Beat the January Blues’. Dit zijn meestal sectoren in verband met vrije tijd, reizen, gezondheid en welzijn, zoals spa’s, schoonheidssalons, fitnesscentra, reisbureaus en bars.
Vergeet niet om de TemplateCloud Tactics te gebruiken voor elk design die u ontwerpt.
Happy designing!
Wij betalen u �500,- per maand voor uw designs!
 TemplateCloud is een online marktplaats waar grafische designers � zoals u � hun designs kunnen uploaden en onbeperkt royalties kunnen verdienen. U maakt designs voor flyers, briefpapier, visitekaartjes enzovoorts. Wij zetten deze designs om in een bewerkbare template zodat dit online kan worden verkocht.
Wij verkopen uw design templates via verschillende websites over de hele wereld. Elke keer dat een klant uw design gebruikt, betalen wij u een royalty. Wij betalen u vooraf � 5,- per inzending voor maximaal 100 designs per maand � dit is gegarandeerd.
Om te beginnen met het ontwerpen heeft u alleen Adobe InDesign nodig en een werkende internetverbinding, en wees creatief.
Als u hulp nodig heeft met het zoeken van afbeeldingen, kunt u ook de Fotolia afbeeldingen gebruiken. U kunt kiezen uit miljoenen afbeeldingen en deze gebruiken in uw design � gratis!
Leeshier meer voor meer informatie.
So what are you waiting for? Bezoek TemplateCloud.com en begin met het verdienen van royalties doormiddel van het verkopen van uw designs.
Algemene voorwaarden:
- 1. ��n account per deelnemer.
- 2. Tijdelijke aanbieding. Geldt alleen voor designs die geleverd en goedgekeurd worden voor 31-12-2012.
- 3. Betalingen kunnen alleen worden gedaan op de vooraf geleverde bankrekeningen.
- 4. Betalingen kunnen alleen worden gedaan doormiddel van het verkopen van designs op grond van de Template Supply Agreement zullen worden verrekend met het totaal betaalde Advanced Template Royalties.
- 5. U mag de Template Supply Agreement niet be�ndigen in verband met iedere design die geleverd is op grond van deze promotie.
- 6. Beperkt aanbod van een maximum van 100 designs per deelnemer, per maand, goedgekeurd en beoordeeld door ons.
Inspiratie nodig?
 To help give you some new ideas for putting together your TemplateCloud designs, we’ve written some design briefs to help get you off to a quick start.
 These briefs feature header, subheader, body copy and design ideas for specific sectors. The industries featured are those recently requested by end clients looking to use TemplateCloud designs on their marketing material.
How to use V Layers in your designs
We’ve added some new functionality to TemplateCloud that along with the new image library will help you make your designs even more flexible for the end user and help you sell more of your designs. It’s called V layers.
V layers mean that you can create irregular shaped editable images as well as having editable images behind locked vector graphics. The result of this is that elements such as images can now be editable along with overlaid text.
So how does it work?
It’s really easy to add this versatile function to your designs. All you need to do is create a mask (or masks) of the shape you want – essentially a vector object on it’s own layer. For example, in this design I’ve created a simple cyan rectangle in InDesign and then punched out 4 circles using the Objects > Pathfinder > Subtract tool:

Next, create a new layer. The layer should be labelled starting with ‘v_’ this is a v_ layer. V is for Vector (not versatile, but it sounded better as a header). Put the mask shape or vector object onto this layer. Your label should be labelled, for instance v_Mask 1. The three images in this example are then placed behind the mask in the layer order like this:

Once your V layer is in place you can then add your editable text as normal above it. The example above has more than one V layer.
The extra layers (coloured in brown) are for the white circles and the white lines on the artwork. You can add as many V layers as you like, but you can only have one vector element per v_layer.
This is how the same file looks to the end user:

Using a V layer gives you a great deal of creative flexibility when building your designs. For example the design below uses vector objects as V Layers that overlay an image, making the image behind editable. The two blue shapes are locked and the text on top is also made editable:

So here the image is editable and so is the ‘Need to get fitâ?¦â? text.
Key points:
- Label your layer as v_ (v_mask for instance)
- Only use vector shapes on V layers
- Only one item per V layer
- You can have more than one V layer per design
- Position any images that are to be editable through your V Layer below the V layer
- Remember that V layers aren’t editable by the end user
Any questions post them below. Happy designing!
How to use colour swatches in your designs
To add a colour choice for the end user to use, add ‘s_â? to the colour name in the swatches panel.
You need to make sure that all the font colours you use in your document are labelled this way so that they display properly in the editor. All colours you use must be Process CMYK, no spot colours, tints or gradients as these will not view or print correctly once they have been edited.
To help you get your colours right, In our template files you will find our full colour chart ready for use with over 150 different swatches. You can download our templates here .
To see an onscreen demonstration of this process, watch the How to Use Colour Swatches in Your Designs video.
How to use Active Updates in your designs
Using Active Updates in your designs means that your templates will be automatically pre-filled with an end-user’s contact details when they are editing your design. This helps to save them time and to better visualise how your design will work for them which could help to get you more design sales.
- {{name}} First name & surname
- {{job_title}} Position or job title
- {{email}} Email address
- {telephone}} Telephone number
- {{fax}} Fax number
- {{mobile}} Mobile number
- {web_address}} Website
- {{business_name}} Business name
- {{address_1}} 1st line of address
- {{address_2}} 2nd line of address
- {{post_town}} 3rd line of address
- {{county}} 4th line of address
- {{postcode}} Postcode
To see an onscreen demonstration of using Active Updates, watch the How to Use Active Updates in Your Designs video.
How to use text in your designs
Non-editable text
On the -Background layer you can use any font you like, just ensure all fixed text is on the lowest -Background layer and converted to outlines.
Editable text
A special ‘server’ font license is required for editing templates. We’ve bought this license for over 1,000 fonts from Linotype which you will need to use for editable areas. You can view or download a full list of this library here.
If you don’t have the exact font on your system you can choose a font with the same name. You will then be prompted to replace it with the Linotype version when building your template via TemplateCloud. For example, use any Frutiger Roman you already have and substitute it with Frutiger LT Pro 55 Roman from the Linotype Originals Library when uploading.
We can only substitute a font if there is an equivalent in the Linotype Originals 2.0 Library. So don’t use a font like Meta – find something similar from the library.
All editable fonts need to be set as a paragraph style in InDesign and named with their font name so they are identifiable. This includes any non-Linotype fonts you intend to replace at the upload stage.
Editable text cannot use special effects and requires certain settings to be applied in InDesign. Read through the list below carefully to make sure you respect all of the editable text requirements:
- Don’t outline text (don’t convert it to paths).
- Don’t use ‘Adobe Paragraph Composer’ justification – set to ‘Adobe Single Line Composer’ instead.
- Don’t use ‘optical’ kerning (use ‘metrics’ instead).
- Don’t use tracking (tracking should be set to ’0′).
- Don’t scale, skew, compress, squash or expand.
- Don’t use any special character effects such as all caps, small caps, superscript,subscript, underline, baseline shift, strike through, ‘forced’ bold, ‘forced’ italic or outlined.
- Don’t use paragraph hyphenation.
- Don’t use soft returns.
- You can’t use text attached to paths.
- Multi-column or linked (threaded) text frames aren’t allowed.
- Tables, bullets and tabs aren’t supported.
- Don’t use inset spacing (padding).
- Avoid Text Wrap.
- Don’t rotate text within a text frame (although its fine to rotate the whole text frame).
- Don’t use non-rectangular text frames.
- Don’t use tint swatches or gradients swatches.
Define your text frame so the user has as much room as they need to fit in the text they want to type (see the example in the below image). Be sure to set the end of the text box carefully so it doesn’t run over important design elements or run off the edge of the page.
Avoid overlapping editable text frames or images as it makes it difficult for the user to pick items to edit. All text boxes should be rectangular.
Set some breathing space
Expand the bottom of your text frame by around 25% of the height of the font. This ‘breathing space’ allows the editor to display descending characters.
To see an onscreen demonstration of this process, watch the How to Use Text in Your Templates video.

How to use logos in your designs
Some businesses will already have a logo, some won’t.Placeholder logos are embedded in all of our starter templates. Position this samplelogo.jpg on your document on its own layer, at a suitable size wherever the client’s logo will be placed on your design (see below left image). Make sure you embed the samplelogo.jpg in your InDesign file as you would with any other images, see this post for more instructions.
Instant logos consist of a graphical device together with some styled text, so that it looks like a logo (see below right image).
The user simply changes their business name and they’ve got an ‘Instant Logo’. To see an onscreen demonstration of how to put placeholder logos in your design, watch the How to Use Logos in Your Designs video video.
